This blog was originally published on D2iQ.com
I’ve recently been doing some work with the new Percona-Server-MongoDB service for DC/OS, and as part of that work I decided to try and build out an IoT architecture using Percona-Server-MongoDB as the persistent storage backend. MongoDB is a popular choice for persistent storage in IoT architectures for a number of reasons, including high scalability, support for complex queries, and the fact that it doesn’t require strict schemas, so you can push documents to it in native JSON with different types for each field. If you want to run the code used in this blog, you can find everything here
Let’s start by looking at the overall architecture of the platform we’re going to deploy :
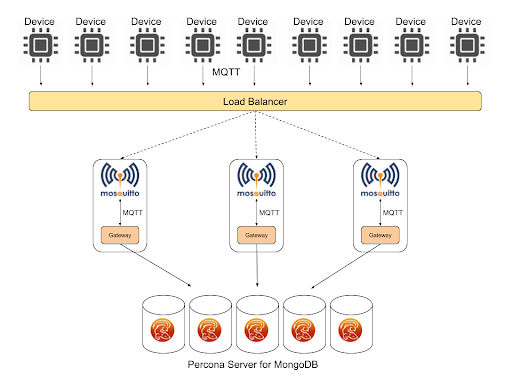
At the top we have a number of data generator devices using the MQTT protocol. MQTT is a standardised protocol designed for sensors, based around a publish/subscribe model. It was developed originally at IBM, by one of my ex-IBM UK colleagues Andy Stanford-Clark, and is designed to run on devices with very low processing overhead. Since we won’t have real devices in our demo environment, I used the Eclipse Paho python library to emulate a device with a single sensor, giving a random output on a configurable sample rate. This could be an industrial sensor, giving a temperature output for example.
MQTT producers need to connect to a broker to publish their data, and in our case we’re going to use the open source Eclipse Mosquitto broker.
In order to pull from our acquisition layer brokers into our aggregation layer of MongoDB, we’re going to need some kind of gateway, which will subscribe to the relevant topics on our broker, get new messages, reformat them and then write them into the MongoDB replica set on the backend. Again I’ve implemented this as a Python based service, using paho-mqtt and the pymongo library.
Let’s take a look at those elements in more detail, starting with the emulated devices. The code for this is very simple :
#!/usr/bin/env python
"""
MQTT generator
"""
import random
import time
import uuid
import json
from argparse import ArgumentParser
import paho.mqtt.client as mqtt
parser = ArgumentParser()
parser.add_argument("-b", "--broker", dest="broker_address",
required=True, help="MQTT broker address")
parser.add_argument("-p", "--port", dest="broker_port", default=1883, help="MQTT broker port")
parser.add_argument("-r", "--rate", dest="sample_rate", default=5, help="Sample rate")
parser.add_argument("-q", "--qos", dest="qos", default=0, help="MQTT QOS")
args = parser.parse_args()
uuid = str(uuid.uuid4())
topic = "device/%s" % uuid
mqttc = mqtt.Client(uuid, False)
mqttc.connect(args.broker_address, args.broker_port)
while True:
rand = random.randint(20,30)
msg = {
'uuid': uuid,
'value': rand
}
mqttc.publish(topic, payload=json.dumps(msg), qos=args.qos)
time.sleep(float(args.sample_rate))
mqttc.loop_forever()
As we can see, our device takes a few different arguments. Firstly the address and port of the MQTT broker to connect to, the rate at which we want to generate values, and a currently unused QOS setting. QOS ( Quality of Service ) is part of the MQTT standard, and you can learn more about this in the Mosquitto docs
On startup the device generates a unique UUID, connects to the MQTT broker on a topic of device/$uuid, and then every sample cycle it generates a random number within a range and then publishes a small JSON payload containing it’s UUID and the value.
In order to run this on DC/OS, we could use pyinstaller to bundle our dependencies as described in my previous blog post on Python microservices, but in this case, we’re going to build a Docker image and publish it to a repository. I’m not going to cover installing Docker in your environment, there are plenty of great How To’s on the internet which can help with this, so we’ll assume you already have a working Docker environment locally.
Firstly we want to generate a text file with the requirements of our application. I’ve developed this in a virtualenv, installing my dependencies from pip, so I can do this by running:
$ pip freeze > requirements.txt
$ cat requirements.txt
paho-mqtt==1.3.1
Our next step is to create a Dockerfile which we will use to build a Docker image. This is very simple in our case:
$ cat Dockerfile
FROM python:2
WORKDIR /usr/src/app
COPY requirements.txt ./
RUN pip install --no-cache-dir -r requirements.txt
COPY device.py .
CMD [ "/bin/bash" ]
In our case, we’re going to use the standard Python 2 Docker image as a base, we’re going to copy in our requirements.txt, use that to install our dependencies using pip, and then copy our actual device code in. Since we’re going to be running this using the Universal Container Runtime, we don’t actually need to define CMD here, but for testing purposes I’ve just set it to run a shell.
Now we’ve got our Dockerfile, we can go ahead and build our Docker image :
$ docker build -t device .
Sending build context to Docker daemon 12.78MB
Step 1/6 : FROM python:2
2: Pulling from library/python
0bd44ff9c2cf: Pull complete
047670ddbd2a: Pull complete
ea7d5dc89438: Pull complete
ae7ad5906a75: Pull complete
0f2ddfdfc7d1: Pull complete
85124268af27: Pull complete
1be236abd831: Pull complete
fe14cb9cb76d: Pull complete
cb05686b397d: Pull complete
Digest: sha256:c45600ff303d92e999ec8bd036678676e32232054bc930398da092f876c5e356
Status: Downloaded newer image for python:2
---> 0fcc7acd124b
Step 2/6 : WORKDIR /usr/src/app
Removing intermediate container ea5359354513
---> a382209b69ea
Step 3/6 : COPY requirements.txt ./
---> b994369a0a58
Step 4/6 : RUN pip install --no-cache-dir -r requirements.txt
---> Running in 1e60a96f7e7a
Collecting paho-mqtt==1.3.1 (from -r requirements.txt (line 1))
Downloading https://files.pythonhosted.org/packages/2a/5f/cf14b8f9f8ed1891cda893a2a7d1d6fa23de2a9fb4832f05cef02b79d01f/paho-mqtt-1.3.1.tar.gz (80kB)
Installing collected packages: paho-mqtt
Running setup.py install for paho-mqtt: started
Running setup.py install for paho-mqtt: finished with status 'done'
Successfully installed paho-mqtt-1.3.1
Removing intermediate container 1e60a96f7e7a
---> 3340f783442b
Step 5/6 : COPY device.py .
---> 72a88b68e43c
Step 6/6 : CMD [ "/bin/bash" ]
---> Running in a128ffb330fc
Removing intermediate container a128ffb330fc
---> dad1849c3966
Successfully built dad1849c3966
Successfully tagged device:latest

$ docker images
REPOSITORY TAG IMAGE ID CREATED SIZE
device latest dad1849c3966 About an hour ago 903MB
python 2 0fcc7acd124b 9 days ago 902MB
Now we have our Docker image locally, we want to publish it so that we can later deploy it using Marathon in DC/OS. First we need to ensure we are logged into Dockerhub :
$ docker login --username=mattjarvis
Password:
Login Succeeded
Now we need to tag our local image :
$ docker tag dad1849c3966 mattjarvis/device:latest
Once the image is tagged, we can push to our repository :
$ docker push mattjarvis/device
The push refers to repository [docker.io/mattjarvis/device]
d52256b6a396: Pushed
6b19db956ca6: Pushed
cd0c68b16296: Pushed
812812e9c2f5: Pushed
05331f1f8e6f: Layer already exists
d8077e47eb94: Layer already exists
5c0800b60a4e: Layer already exists
ebc569cb707f: Layer already exists
9df2ff4714f2: Layer already exists
c30dae2762bd: Layer already exists
43701cc70351: Layer already exists
e14378b596fb: Layer already exists
a2e66f6c6f5f: Layer already exists
latest: digest: sha256:8a1407f64dd0eff63484f8560b605021fa952af00552fec6c8efb913d5bba076 size: 3053
Before we get started with our actual deployment, let’s also look at our second piece of code, which is the connector between our MQTT broker, and our MongoDB cluster. Again this is written in Python :
$ cat mongogw.py
#!/usr/bin/env python
"""
MQTT to MongoDB Gateway
"""
import json
from argparse import ArgumentParser
import paho.mqtt.client as mqtt
import pymongo
import datetime
import os
parser = ArgumentParser()
parser.add_argument("-b", "--broker", dest="broker_address",
required=True, help="MQTT broker address")
parser.add_argument("-p", "--port", dest="broker_port", default=1883, help="MQTT broker port")
parser.add_argument("-m", "--mongouri", dest="mongo_uri", required=True, help="MongoDB URI")
parser.add_argument("-u", "--mongouser", dest="mongo_user", required=True, help="MongoDB user")
parser.add_argument("-w", "--mongopwd", dest="mongo_password", required=True, help="MongoDB password")
args = parser.parse_args()
def on_message(client, userdata, message):
json_data = json.loads(message.payload)
post_data = {
'date': datetime.datetime.utcnow(),
'deviceUID': json_data['uuid'],
'value': json_data['value'],
'gatewayID': os.environ['MESOS_TASK_ID']
}
result = devices.insert_one(post_data)
# MongoDB connection
mongo_client = pymongo.MongoClient(args.mongo_uri,
username=args.mongo_user,
password=args.mongo_password,
authSource='mongogw',
authMechanism='SCRAM-SHA-1')
db = mongo_client.mongogw
devices = db.devices
# MQTT connection
mqttc = mqtt.Client("mongogw", False)
mqttc.on_message=on_message
mqttc.connect(args.broker_address, args.broker_port)
mqttc.subscribe("device/#", qos=0)
mqttc.loop_forever()
In this case, we connect to both the MQTT broker and MongoDB, then we subscribe to all of the MQTT topics prefixed with device/ and then use a callback function each time we read a message, to reformat the message and add some additional metadata of our own, before writing it into MongoDB. We add a timestamp at this stage, which reflects the possibility that in a real world example our sensor devices may not have enough processing power to provide a clock function. We also add the Mesos task ID of the gateway process, which will allow us to track which gateway the message came through as we scale up the acquisition layer.
We’ll build this in exactly the same way as the device example, using a Dockerfile and pushing a Docker image to a repository. The Dockerfile for this is very similar to the device :
$ cat Dockerfile
FROM python:2
WORKDIR /usr/src/app
COPY requirements.txt ./
RUN pip install --no-cache-dir -r requirements.txt
COPY mongogw.py .
CMD [ "/bin/bash" ]
So now we have our custom code, let’s go ahead and start our deployment. The first thing we want to deploy is our MongoDB replica set. I’ve written a longer post about the Percona-Server-MongoDB service where you can find out more about the advanced feature set of this service, but for the purposes of this demo we’ll just use the defaults, which will give us a three node replica set. Firstly we need to create a config file which sets up the default users, passwords and keys. It should look something like this :
$ cat demo.json
{
  "mongodb-credentials": {
    "backupUser": "backup",
    "backupPassword": "backupuserpassword",
    "userAdminUser": "useradmin",
    "userAdminPassword": "useradminpassword",
    "clusterAdminUser": "clusteradmin",
    "clusterAdminPassword": "clusteradminpassword",
    "clusterMonitorUser": "clustermonitor",
    "clusterMonitorPassword": "monitoruserpassword",
    "key": "8cNNTVP6GqEOKzhUVDVryxIt04K6kDbXygamH4upPGAO59gzXVQAgX9NwxwqDvpt 094zMkkRWDLzuCgbg3Aj8EFVEM0/W1Nz+XUSTHEn4HiNzCVG4TTHFP6P1PEPswG6 tQMP6bnRXL7uGWmdGhbAxOV/+p6AfNs67MTvfCeH0EaPCgPPXhJft9D0nZ0SPOm9 VvfxG3djnHClIlclkchoIwc1Kw21loyXwuOjX4RkywVDdmFXjKC+l9yxfyt/9Gyh YE0OlS7ozWLiH8zy0MyzBdK+rc0fsxb2/Kb/8/2diC3O3gdVxjneQxaf66+FHVNW mV9/IHDptBHosdWkv0GboW8ZnTXnk0lyY0Jw85JFuTeFBzqPlB37jR0NU/HFm5QT Ld62woaGIWCTuXGb81QHaglPZUBIhEq/b3tahJBmLc+LKd0FUShoupTtPc2FjxbH xD8dZ+L9Uv7NPtSe+o3sTD60Pnsw1wbOrNDrrC+wpwoMy2GbQjXk/d+SRK/CXfuk Z676GKQDivpinhdF58l4OEi+WEN633yuNtNAQDgz+aOVZKN4oLoyR22B1nrea1qW wzZjRw7kpVxcQKiyn+gDmAZZPbctiVqTNHPE5n9LrOcctuLZKpoQk97lvZTSCKfy d32mfx9szZZ/QCfF9Dt7+G5nJUAULigKnQYRi/i86ZTPHSzfun+ZIzYLCzJuZfyS 7E8DMsmv9wCPrPAF/8cOFMWW0o0Na7GZKCJ8U+AMm92R725h4g5ao6+kQPG7vOkY LR8MJzDOqcmAC0M9AwE5UXQl56V6qBNyREx/WGGYS1B5DOfZvVTJNDkoHVIL1upZ geSlACiXQ+M0Rkgo0h8BJUhGY9LTuc6S8qiMBEnhBClg4kA/u4FJ06nlmF3ZpIXT KsVSr9ee3mu0vSr6P52slvAAX+RL3y+JgSlz2kC8oVgCZZdKn7yq9e6yB3zHNMjX 8VIi/UgFmfqCiaAlUT0pt2ZzGuw1L9QUOuNAZfufSkK1ED4V"
  }
}
The passwords for the users must have a minimum of 10 characters, and the key must be at least 1024 characters long, you can generate an appropriate key on MacOS using :
$ openssl rand -base64 756
Now we have our options.json we can use it to install the package :
$ dcos package install percona-server-mongodb --options=demo.json
By Deploying, you agree to the Terms and Conditions https://d2iq.com/catalog-terms-conditions/#community-services
Default configuration requires 3 agent nodes each with: 1.0 CPU | 1024 MB MEM | 1 1000 MB Disk
Continue installing? [yes/no] yes
Installing Marathon app for package [percona-server-mongodb] version [0.4.0-3.6.6]
Installing CLI subcommand for package [percona-server-mongodb] version [0.4.0-3.6.6]
New command available: dcos percona-server-mongodb
The DC/OS Percona Server for MongoDB service is being installed.
Documentation: https://docs.mesosphere.com/service-docs/percona-server-mongodb/
Issues: https://jira.percona.com/secure/CreateIssue!default.jspa?pid=12402.
We also want to configure a user for the database we’re going to use. We can do this directly from the DC/OS CLI, using the Percona-Server-MongoDB CLI extension. Firstly we need to create a JSON file defining the user we want to create :
$ cat mongouser.json
{
  "user": "mongogw",
  "pwd": "123456",
  "roles": [
    { "db": "mongogw", "role": "readWrite" }
  ]
}
Now we pass that to the CLI, along with the name of the database, and the credentials for our admin user with user administration permissions :
$ dcos percona-server-mongodb user add mongogw mongouser.json
{
  "message": "Received cmd: start update-user with parameters: {MONGODB_CHANGE_USER_DB=mongogw, MONGODB_CHANGE_USER_DATA=eyJ1c2VycyI6W3sidXNlciI6Im1vbmdvZ3ciLCJwd2QiOiIxMjM0NTYiLCJyb2xlcyI6W3sicm9sZSI6InJlYWRXcml0ZSIsImRiIjoibW9uZ29ndyJ9XX1dfQ==}"
}
Next, we’re going to deploy our MQTT layer. Since we may theoretically have many thousands of devices, it’s important our acquisition layer is scalable. We’re going to achieve this on the MQTT side by load balancing multiple instances of Mosquitto endpoints using a named VIP in DC/OS, although in a real world internet facing example we would probably use Marathon-LB instances exposed outside of our cluster.
Whilst this will work for the device facing side, if we were to use the VIP from our gateway layer, and we want the gateway layer also to be scalable, then we could potentially end up with missing data since our gateways could be reading from any of the Mosquitto instances, and the MQTT layer isn’t clustered. To solve this problem, we’ll deploy each Mosquitto instance together with it’s own dedicated gateway microservice in a pod ( https://docs.mesosphere.com/1.11/deploying-services/pods/ ), and have the gateway microservice connect to Mosquitto over the localhost connection, ensuring each gateway only gets data from a single Mosquitto instance. So for a device connecting via the loadbalancer address, it can connect to any of our deployed Mosquitto instances and our storage layer will get the data.
Here’s the JSON we’re going to use to deploy the pod :
{
  "id": "/mqtt",
  "containers": [
    {
      "name": "mosquitto",
      "resources": {
        "cpus": 0.1,
        "mem": 64
      },
      "image": {
        "id": "eclipse-mosquitto",
        "kind": "DOCKER"
      },
      "endpoints": [
        {
          "name": "mqtt",
          "containerPort": 1883,
          "hostPort": 1883,
          "protocol": [
            "tcp"
          ],
          "labels": {
            "VIP_0": "/mqtt:1883"
          }
        }
      ]
    },
    {
      "name": "mongogw",
      "resources": {
        "cpus": 0.1,
        "mem": 64
      },
      "image": {
       "id": "mattjarvis/mongogw",
       "kind": "DOCKER"
      },
      "exec": {
        "command": {
          "shell": "./mongogw.py -b localhost -m mongo-rs-0-mongod.percona-server-mongodb.autoip.dcos.thisdcos.directory,mongo-rs-1-mongod.percona-server-mongodb.autoip.dcos.thisdcos.directory,mongo-rs-2-mongod.percona-server-mongodb.autoip.dcos.thisdcos.directory:27017 -u mongogw -n 123456"
        }
      }
    }
  ],
  "scaling": {
    "instances": 1,
    "kind": "fixed"
  },
  "networks": [
    {
      "name": "dcos",
      "mode": "container"
    }
  ],
  "volumes": [],
  "fetch": [],
  "scheduling": {
    "placement": {
      "constraints": []
    }
  }
}
Mosquitto provide a pre-built Docker image, so we’ll use that for our first container. We also need to expose port 1883 for MQTT connections, so we map that to a port on the host and expose it via a load balanced VIP.
The second container is our mongogw Python microservice, and it will launch the mongogw process, connecting to Mosquitto over localhost, and to MongoDB replica set using the DC/OS assigned DNS names for each of the MongoDB instances.
To run this, we just pass the JSON to Marathon using the DC/OS CLI :
$ dcos marathon pod add mqttpod.json
Created deployment 19887892-f3e9-44b4-9dd3-22a5790196f3
Now our acquisition layer is up and running, we can start our devices. Here we also need some Marathon configuration in JSON :
{
  "id": "device",
  "instances": 1,
  "cpus": 0.1,
  "mem": 16,
  "cmd": "./device.py -b mqtt.marathon.l4lb.thisdcos.directory -r 2",
  "container": {
    "type": "MESOS",
    "docker": {
      "image": "mattjarvis/device",
      "forcePullImage": true,
      "privileged": false
    }
  },
  "requirePorts": false
}
We’re going to use the Universal Container Runtime, pull the relevant Docker image, and run the python script with some arguments, configuring the device to connect to the load balanced VIP we assigned for the Mosquitto pods and to publish at 2 second intervals. As we can see, the CPU and RAM requirements for this are very small, so we should be able to scale this up and run many instances.
So let’s go ahead and deploy our first device :
$ dcos marathon app add device.json
Created deployment 231be2c7-47c6-4f28-a7e0-40f4aae2f743
Once our first device is up and running, we can check in MongoDB to ensure all of our layers are operating correctly. First we need a task ID for one of our MongoDB replica set :
$ dcos task
NAME HOST USER STATE ID MESOS ID REGION ZONE
admin-0-watchdog 10.0.2.229 root R admin-0-watchdog__a3ff9cc4-daeb-4f76-b730-aea8e2667417 3ba115f5-b4fe-43e9-a05a-0d9b0240fb51-S4 --- ---
device 10.0.3.192 root S device.769ef300-b75d-11e8-9d5d-fe0bc23c90b8 3ba115f5-b4fe-43e9-a05a-0d9b0240fb51-S3 --- ---
mongo-rs-0-mongod 10.0.0.44 root R mongo-rs-0-mongod__f0a27fca-138a-4f39-a0b2-4a1a0960c079 3ba115f5-b4fe-43e9-a05a-0d9b0240fb51-S6 --- ---
mongo-rs-1-mongod 10.0.3.152 root R mongo-rs-1-mongod__a039fb0f-6ca7-4706-974a-855542fa5e36 3ba115f5-b4fe-43e9-a05a-0d9b0240fb51-S2 --- ---
mongo-rs-2-mongod 10.0.0.26 root R mongo-rs-2-mongod__5c68c451-c11d-49bd-bf49-e99b8bcceb5c 3ba115f5-b4fe-43e9-a05a-0d9b0240fb51-S1 --- ---
mongogw 10.0.0.44 root R mqtt.instance-565e6b1f-b75d-11e8-9d5d-fe0bc23c90b8.mongogw 3ba115f5-b4fe-43e9-a05a-0d9b0240fb51-S6 --- ---
mosquitto 10.0.0.44 root R mqtt.instance-565e6b1f-b75d-11e8-9d5d-fe0bc23c90b8.mosquitto 3ba115f5-b4fe-43e9-a05a-0d9b0240fb51-S6 --- ---
percona-server-mongodb 10.0.0.26 root R percona-server-mongodb.cfbfcaae-b75b-11e8-9d5d-fe0bc23c90b8 3ba115f5-b4fe-43e9-a05a-0d9b0240fb51-S1 --- ---
Once we have a task ID, we can use the DC/OS CLI to get a shell inside that container :
$ dcos task exec --tty --interactive mongo-rs-0-mongod__f0a27fca-138a-4f39-a0b2-4a1a0960c079 /bin/bash
root@ip-10-0-0-44:/mnt/mesos/sandbox#
And then use the mongo shell to connect to MongoDB :
root@ip-10-0-0-44:/mnt/mesos/sandbox# mongo mongodb://mongogw:123456@mongo-rs-0-mongod.percona-server-mongodb.autoip.dcos.thisdcos.directory,mongo-rs-1-mongod.percona-server-mongodb.autoip.dcos.thisdcos.directory,mongo-rs-2-mongod.percona-server-mongodb.autoip.dcos.thisdcos.directory:27017/mongogw?replicaSet=rs
Note that we’re using the user we created earlier, along with the automatically assigned DC/OS DNS entries for each of our MongoDB replica set.
Now we should end up with a MongoDB shell prompt, so let’s switch to our database :
rs:PRIMARY> use mongogw;
switched to db mongogw
From here, we can count how many entries we now have in our devices collection :
rs:PRIMARY> db.devices.count();
117
And we can also look at the inserted data :
rs:PRIMARY> db.devices.findOne();
{
  "_id" : ObjectId("5b9a6db71284f4000452fd31"),
  "date" : ISODate("2018-09-13T14:01:27.529Z"),
  "deviceUID" : "f5265ed9-a162-4c72-926d-f537b0ef356c",
  "value" : 22,
  "gatewayID" : "mqtt.instance-565e6b1f-b75d-11e8-9d5d-fe0bc23c90b8.mongogw"
}
From this output, we can see the re-formatted data coming in from our gateway process, which has also added a timestamp, and the task ID of the gateway process in DC/OS.
So we can now see data being acquired for our single device, let’s scale up the devices. In our device.json, let’s increase the number to 3 :
$ cat device.json
{
  "id": "device",
  "instances": 3,
  "cpus": 0.1,
  "mem": 16,
  "cmd": "./device.py -b mqtt.marathon.l4lb.thisdcos.directory -r 2",
  "container": {
    "type": "MESOS",
    "docker": {
      "image": "mattjarvis/device",
      "forcePullImage": true,
      "privileged": false
    }
  },
  "requirePorts": false
}
And now we’ll use that modified JSON to update our app :
$ dcos marathon app update device < device.json
Created deployment 83c91f20-9944-4933-943b-90cee2711640
And when we look at the DC/OS UI, we can see we now have 3 device instances : We can also now see different UUID’s in the data being received by our MongoDB layer :
rs:PRIMARY> db.devices.find().limit(5).sort({$natural:-1})
{ "_id" : ObjectId("5b9a6ef01284f4000452fdef"), "date" : ISODate("2018-09-13T14:06:40.698Z"), "deviceUID" : "919473a4-b332-4929-9b5e-c0a80f498222", "value" : 24, "gatewayID" : "mqtt.instance-565e6b1f-b75d-11e8-9d5d-fe0bc23c90b8.mongogw" }
{ "_id" : ObjectId("5b9a6ef01284f4000452fdee"), "date" : ISODate("2018-09-13T14:06:40.165Z"), "deviceUID" : "9474a1ee-c1c7-4f1d-a012-c6e4c883c7d3", "value" : 27, "gatewayID" : "mqtt.instance-565e6b1f-b75d-11e8-9d5d-fe0bc23c90b8.mongogw" }
{ "_id" : ObjectId("5b9a6eef1284f4000452fded"), "date" : ISODate("2018-09-13T14:06:39.882Z"), "deviceUID" : "f5265ed9-a162-4c72-926d-f537b0ef356c", "value" : 29, "gatewayID" : "mqtt.instance-565e6b1f-b75d-11e8-9d5d-fe0bc23c90b8.mongogw" }
{ "_id" : ObjectId("5b9a6eee1284f4000452fdec"), "date" : ISODate("2018-09-13T14:06:38.696Z"), "deviceUID" : "919473a4-b332-4929-9b5e-c0a80f498222", "value" : 25, "gatewayID" : "mqtt.instance-565e6b1f-b75d-11e8-9d5d-fe0bc23c90b8.mongogw" }
{ "_id" : ObjectId("5b9a6eee1284f4000452fdeb"), "date" : ISODate("2018-09-13T14:06:38.163Z"), "deviceUID" : "9474a1ee-c1c7-4f1d-a012-c6e4c883c7d3", "value" : 25, "gatewayID" : "mqtt.instance-565e6b1f-b75d-11e8-9d5d-fe0bc23c90b8.mongogw" }
As we can see, these are all using the same gateway, as we only have one deployed, so let’s go and deploy another pod in that layer. Again we modify the number of instances in our JSON, and then update the pod configuration :
$ dcos marathon pod update mqtt < mqttpod.json
Created deployment 1fdc863b-9815-417e-87ac-858b56f8630f
Since all of our devices are already attached to the first gateway through the load balanced VIP, let’s increase the device count to 5, and update as above. Once our new devices are up and running, because they are using the load balancer, we should see some of them connect to the new gateway. We can query MongoDB again and see we now have more than one gateway ID in our received data :
rs:PRIMARY> db.devices.find().limit(5).sort({$natural:-1})
{ "_id" : ObjectId("5b9a6f981284f4000452fef9"), "date" : ISODate("2018-09-13T14:09:28.076Z"), "deviceUID" : "f5265ed9-a162-4c72-926d-f537b0ef356c", "value" : 26, "gatewayID" : "mqtt.instance-565e6b1f-b75d-11e8-9d5d-fe0bc23c90b8.mongogw" }
{ "_id" : ObjectId("5b9a6f971284f4000452fef8"), "date" : ISODate("2018-09-13T14:09:27.158Z"), "deviceUID" : "43e2785e-90b2-4cac-9e68-c3b72984f83c", "value" : 27, "gatewayID" : "mqtt.instance-565e6b1f-b75d-11e8-9d5d-fe0bc23c90b8.mongogw" }
{ "_id" : ObjectId("5b9a6f964931e30004900d25"), "date" : ISODate("2018-09-13T14:09:26.942Z"), "deviceUID" : "6b9d763b-699e-47eb-8541-704931dbb6e9", "value" : 26, "gatewayID" : "mqtt.instance-6f0de323-b75e-11e8-9d5d-fe0bc23c90b8.mongogw" }
{ "_id" : ObjectId("5b9a6f961284f4000452fef7"), "date" : ISODate("2018-09-13T14:09:26.882Z"), "deviceUID" : "919473a4-b332-4929-9b5e-c0a80f498222", "value" : 30, "gatewayID" : "mqtt.instance-565e6b1f-b75d-11e8-9d5d-fe0bc23c90b8.mongogw" }
{ "_id" : ObjectId("5b9a6f961284f4000452fef6"), "date" : ISODate("2018-09-13T14:09:26.363Z"), "deviceUID" : "9474a1ee-c1c7-4f1d-a012-c6e4c883c7d3", "value" : 26, "gatewayID" : "mqtt.instance-565e6b1f-b75d-11e8-9d5d-fe0bc23c90b8.mongogw" }
Finally we can also scale our MongoDB layer, scaling reads horizontally by adding further instances to our replica set or vertically by changing the size of the instances. For the purposes of this demo, let’s add another two instances to our replica set. We can do this very simply in the DC/OS UI, by clicking on the Percona-Server-MongoDB service, then clicking Edit, and selecting the MongoDB tab :
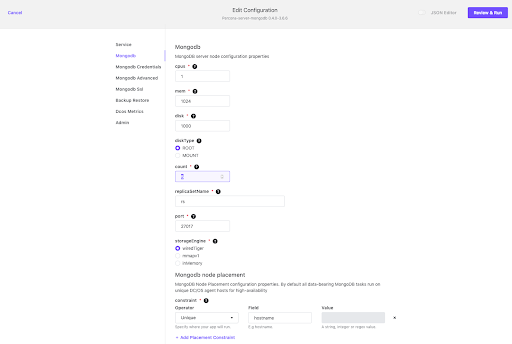
Change the count from 3 to 5. Once we’ve changed the configuration, click on Review and Run, then Run Service, and the Percona-Server-MongoDB service will deploy an additional two instances to our replica set.
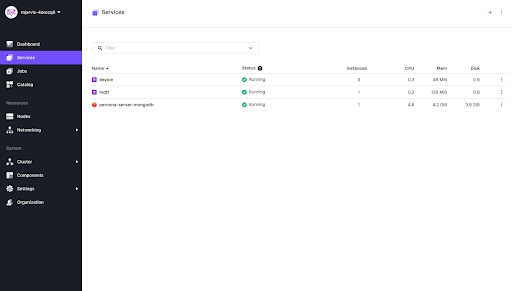
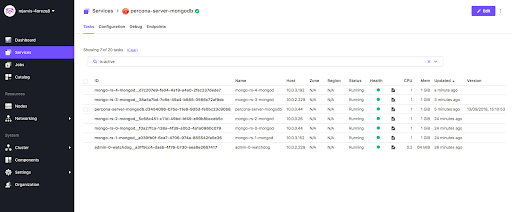
Once the deployment is completed, we’ll see another two instances of mongod in the Services tab, with no interruptions to the Percona-Server-MongoDB service itself.
So we can see that we’ve ended up with a highly scalable architecture in each of the layers of our demo IoT application, and DC/OS made it extremely easy to deploy and manage. As the number of devices increases, we can simply deploy more Mosquitto/Gateway pods behind our load balancer, and if we need additional capacity or performance on our storage layer, we can very easily scale the MongoDB layer using the Percona-Server-MongoDB service to either scale vertically or horizontally. You can find all the code used above, along with the Dockerfiles and Marathon configuration, in the DC/OS demos github repository.